Add Multiple Signers to Your Document
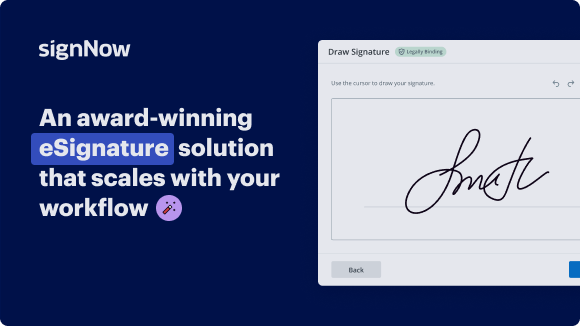
Award-winning eSignature solution


How to add multiple signers to a document with airSlate SignNow
If you need more than one person to sign your document, simply add more signers to your eSignature invite and provide the necessary fields in the document for all your recipients to fill out.
Create multiple signer roles
Open your document in the editor and click the Edit Signers button.

Click on the blue silhouette icon to add one or more signers to your document. You can also customize your signer names and add their email addresses right away if needed.
When finished, click Save Signers.

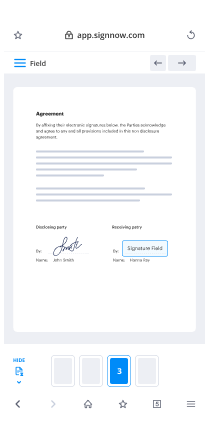
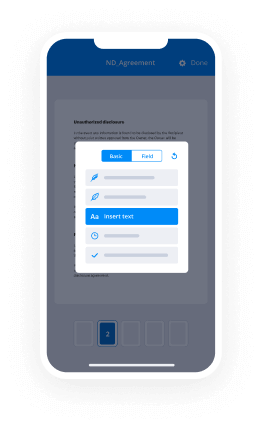
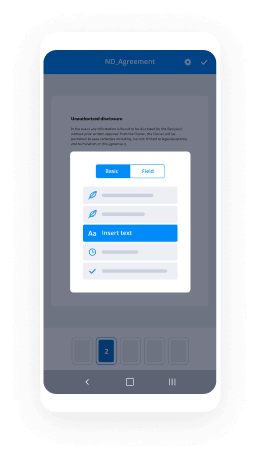
Add fillable fields to your document
Select Signer 1 in the toolbar on the left and then choose the type of field you need to add. Drop the fields anywhere on the document and adjust their positioning and size as needed.

Then, select Signer 2 and add fields for your second signer. Switch to Signer 3 and do the same for the third signer, and so on (depending on how many signers you added during the previous step).

The different colors of your fillable fields indicate that they are assigned to different signers.
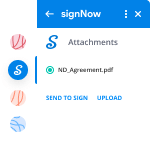
Send your document for eSignature
Click Invite to Sign in the editor and enter your recipients’ email addresses. You can edit your email’s subject and message for each signer by clicking Customize Message.
If you don’t want to send your eSignature invite to all your recipients at the same time, click In Order and configure your signing steps.
When finished, hit the Send Invite button.

See airSlate SignNow eSignatures in action
Choose a better solution
Take routine paperwork off your plate with airSlate SignNow
Online signature service
Fillable template creator
Document templates
eSignature API
App-native integrations
Ability to add multiple signers to your document
Our user reviews speak for themselves


airSlate SignNow solutions for better efficiency
Why choose airSlate SignNow
-
Free 7-day trial. Choose the plan you need and try it risk-free.
-
Honest pricing for full-featured plans. airSlate SignNow offers subscription plans with no overages or hidden fees at renewal.
-
Enterprise-grade security. airSlate SignNow helps you comply with global security standards.

Upgrade your eSignature workflow with the add multiple signers to your document feature
With airSlate SignNow, you can easily elevate the collecting of electronic signatures by specifying a definite order for multiple recipients to sign. For example, you have an Expense Approval that should be signed by three people (Employee, Supervisor, and Accountant) one by one. Using the add multiple signers to your document option and advanced eSigning tools, you can organize and customize a sequence of signatures. This lets you specify and track the order in which your recipients receive and certify your document. Thus, the Accountant receives the form only after the Supervisor certifies it.
How to use airSlate SignNow’s advanced feature - add multiple signers to your document:
- Sign up for a free trial or log in to your airSlate SignNow account.
- Upload a template or a document and click on it to open it in the editor.
- Click Edit Signers at the top of the left-side toolbar.
- Type recipient data in the Signing Step 1 field (this signer(s) will sign first).
- Click the blue icon below the address line to add more recipients.
- Define who will certify the document next in the Signing Step 2 section. Repeat for all the following steps.
- Customize the signing order and change, or delete signers.
- Hit the Save Signers button when you’re done.
- Add clickable fields from the Tools menu by dragging and dropping and then assigning them to each signer accordingly.
- Apply Invite to Sign to proceed to send the form or Save and Close to save settings.
With the add multiple signers to your document tool set up, you can create and adjust a recipient routing order. Specify several parties in each step with the blue icon, and you can even add multiple steps as well. Each person in a list receives an email notification once the previous users have completed their part. Send, eSign, and collect signatures your way with airSlate SignNow.
How it works


See exceptional results add multiple signatures to pdf


How to complete and eSign a document online
Check out the quickest method to add multiple signers to your document. Steer clear of paper-based workflows and deal with documents from airSlate SignNow. Fill out and send out your PDFs from your business office or effortlessly work on-the-go. No installation or additional application required. All benefits are available online, just go to signnow.com and make your own eSignature flow.
A brief manual concerning how to add multiple signers to your document in minutes
- Create an airSlate SignNow profile (in the event you haven't signed up yet) or log in with your Google or Facebook.
- Click Upload and select one of the PDFs.
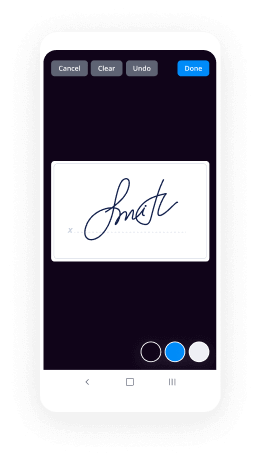
- Take advantage of the My Signature tool to make your unique signature.
- Transform the sample in a powerful PDF with fillable fields.
- Complete your form and click on Done.
Once completed, send out an invite to sign to several users. Have an enforceable agreement within minutes making use of any device. Find a lot more functions for creating professional PDFs; add fillable fields add multiple signers to your document and collaborate in teams. The eSignature solution provides a reliable process and runs in accordance with SOC 2 Type II Certification. Ensure that all your information are protected so no one can edit them.
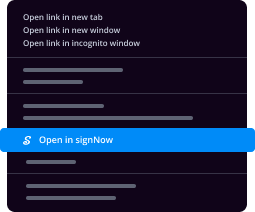
How to eSign a PDF template in Google Chrome
Do you need a service to add multiple signers to your document straight from Chrome? The airSlate SignNow extension for Google is here to assist. Find a document and right from the web browser easily open it in the editor. Put fillable fields for textual content and eSignature. Sign the PDF file and share it safely in accordance with GDPR, SOC 2 Type II Certification and more.
Employing this short how-to guide under, expand your eSignature process into Google and add multiple signers to your document:
- Go to the Chrome web store and find the airSlate SignNow extension.
- Click on Add to Chrome.
- Sign in to the account or register a new one.
- Upload a document and click on Open in airSlate SignNow.
- Adjust the document.
- Sign the PDF file using the My Signature feature.
- Simply click Done to save the edits.
- Ask other individuals to eSign by clicking Invite to Sign and selecting their emails/names.
Make a signature that's built in to your processes to add multiple signers to your document and receive PDFs eSigned quickly. Forget the piles of paperwork on your desk and begin saving time and money for additional crucial activities. Choosing the airSlate SignNow Google extension is a smart practical option with a lot of benefits.
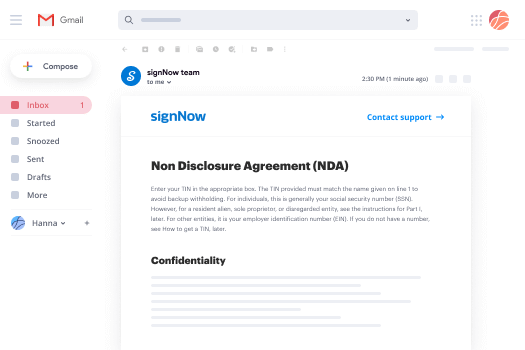

How to sign an attachment in Gmail
If you're like most, you're used to downloading the email attachments you receive, printing them out then putting your signature on them, isn't it? Okay, we have now very good news to suit your needs. Signing documents with your inbox just got easier. The airSlate SignNow add-on for Gmail enables you to add multiple signers to your document without leaving your mailbox. Do everything that you need; put fillable fields and send signing links in a few clicks.
How you can add multiple signers to your document in Gmail:
- Find airSlate SignNow for Gmail in the G Suite Marketplace and click on Install.
- Log in to the airSlate SignNow profile or make a new one.
- Open up your email with the PDF you should sign.
- Click Upload to save the PDF to the airSlate SignNow profile.
- Just click Open document to start the editor.
- Sign the PDF taking advantage of My Signature.
- Send out a signing request to the other customers using the Send to Sign tool.
- Put in their email and click OK.
As a result, other participants will get message telling them to eSign the PDF. No requirement to download the attachment over and over again, just add multiple signers to your document in a few clicks. This add-one is perfect for those who choose concentrating on more essential goals as an alternative to burning up time for practically nothing. Boost your day-to-day monotonous tasks with the award-winning eSignature service.
How to sign a PDF template on the go with no app
For a lot of solutions, getting deals done on the go means installing the mobile app on the smartphone. We're delighted to say at airSlate SignNow we've produced singing on the go faster and much easier by reducing the necessity for a mobile app. To eSign, start your browser (any mobile browser) and try out direct access to airSlate SignNow and all of its powerful eSignature features. Change docs, add multiple signers to your document and much more. No installation or additional software necessary. Close your offer from any place.
Check out our brief guide that teach you the best way to add multiple signers to your document.
- Start your internet browser and visit signnow.com.
- Log in or create a new profile.
- Add or open the document you need to change.
- Put fillable fields for textual content, eSignature and date.
- Draw, type or upload your eSignature.
- Click Save and Close.
- Click on Invite to Sign and enter in a recipient's email if you want others to sign the PDF file.
Working on smartphone is no different than on a laptop: build a reusable template, add multiple signers to your document and handle the documentation as you would normally. In several minutes, receive an enforceable commitment that you can download to the device and share to others. However, if you truly want a software, download the airSlate SignNow mobile app. It's secure, fast and has an incredible interface. Take advantage of in effortless eSignature workflows from your business office, in a taxi or on a plane.

How to sign a PDF using an iPhone
iOS is a very popular operating system packed with native tools. It allows you to eSign and modify PDFs utilizing Preview without any extra software. However, as great as Apple's solution is, it doesn't offer any automation. Enhance your iPhone's functionality by using the airSlate SignNow iPhone app. Utilize your iPhone or iPad to add multiple signers to your document and much more. Bring in eSignature automation for your mobile processes.
Inserting your signature by using an iPhone has never been simpler:
- Find the airSlate SignNow iPhone app from the AppStore and install it.
- Create a new account or log in with the Facebook or Google.
- Click on Plus and add the document you would like to sign.
- Click on the PDF file exactly where you want to put in your signature.
- Try out additional features: add more fillable fields or add multiple signers to your document.
- Utilize the Save button to make the adjustments.
- Share your PDF files via mail or a singing link.
Take a professional-looking PDFs right from your airSlate SignNow application. Get the most from your time and job from just about anywhere; in your own home, work, on a bus or plane, as well as at the beach. Control an entire document workflow easily: make reusable templates, add multiple signers to your document and work on PDFs with business partners. Turn your device into a potent company tool for executing contracts.
How to sign a PDF using an Android
For Android users to deal with agreements using their mobile, they have to set up extra software. The Play Market is huge and plump with options, so choosing a great app isn't a challenge when you have a chance to look through numerous programs. To save efforts and prevent aggravation, we propose airSlate SignNow for Android. Store and edit documents, create signing roles, and even add multiple signers to your document.
The 9 simple actions to optimizing your smartphone workflow:
- Open the application.
- Log in using your Facebook or Google accounts or register if you haven't authorized yet.
- Click + to add a new document with your camera, internal or cloud storages.
- Tap anywhere on the PDF and insert your eSignature.
- Click on OK to confirm and sign.
- Experience a lot more enhancing functions; add more pictures, add multiple signers to your document, make a reusable template, and so on.
- Click Save to apply changes after you finish.
- Download the PDF or share it via mail.
- Use the Invite to sign function if you want to establish & send a signing link to recipients.
Turn the mundane and monotonous work into simple and smooth using the airSlate SignNow application for smartphone. Sign and send out templates for eSignature from just about anywhere you're connected to the internet. Make professional PDFs and add multiple signers to your document with just a few clicks. Created a faultless eSignature process with only your mobile phone and increase your total productivity.
Get legally-binding signatures now!
FAQs multiple signatures on pdf
-
How will my recipients understand where to sign?
Each of your signers will be automatically guided to the fields they are required to complete. If they disable the Wizard, they will still be able to easily locate the boxes they need to fill and sign. Just make sure to assign your fields to the correct signers. -
Will all my signers receive a document at the same time?
You can either send your document to every recipient at once or set up multiple signing steps so that each signer (or group of signers) receives the document in a specific order. -
How do I configure a signing order for my document?
Click Edit Signers in the editor. In the pop-up, click on the Signing Step 2 area to create a new signing step. To add a third signing step, click Signing Step 3, and so on. Enter signer emails for each signing step. Drag and drop signers to move them between signing steps. When finished, click Save Signers. -
How do I assign signer roles?
Open your document in the editor and click Edit Signers in the menu on the left. Then, click on the silhouette icon below the email field, enter a signer’s email address, and hit Save Signers. Alternatively, you can click on any field in a document, open the Role dropdown on the right, and select Add Role. In a new dialog box, enter another signer’s name and click Add New Role. -
How do I add a fillable field to a document?
Open your document in the airSlate SignNow editor and select the fillable field you need from the toolbar on the left. Then, click anywhere on the document to place the field. You can adjust its size and placement as needed. When finished, click OK. -
How do I send a document to someone to sign?
Upload a document to your airSlate SignNow account and click Invite to Sign. You can also send a document for signing as a freeform (without fillable fields) or share it via a signing link. -
How do I upload documents to airSlate SignNow using an Android device?
To upload a document to your airSlate SignNow account, tap + in the bottom right corner of the airSlate SignNow app for Android. In the action menu, select one of the upload options. Once your document is uploaded, it will open in the editor where you can sign it or prepare the document for another person to sign. -
How do I invite signers?
Upload a document to airSlate SignNow and open it in the editor. Select Signature Field in the left-hand sidebar and click anywhere on the document to place a signature field. Then, click Invite to Sign in the top right corner of the screen, enter the recipient’s email address, and hit Send Invite. -
Can a person have multiple digital signatures?
Yes, a document can have multiple Digital Signatures. -
How do I put multiple signatures on a PDF?
Open a PDF that contains multiple signature fields. Right click the first signature field to be signed and choose the airSlate SignNow with Visible Signature option. The airSlate SignNow Document window will appear. ... Click Sign. Save the PDF & enter the password for your Certificate/USB Token. -
What kind of fields can I add to my documents with airSlate SignNow?
airSlate SignNow allows you to add different types of fillable fields to your documents, including text fields, signature fields, date/time fields, calculated fields, initials fields, checkbox fields, radio button groups, dropdown fields, and attachment fields. -
What is a field label?
Labels are best explained as field names or instructions for what should be added to a field (e.g., Last Name, State, Phone Number, etc.). With airSlate SignNow, signers can auto-fill identically labeled fields with one click throughout an entire document. Labels are available for Text fields, Date/Time fields, and Dropdown fields. -
What is pre-filled text?
With airSlate SignNow, you can prefill documents with information you already know. For example, if you know your signer’s name, you can add it as pre-filled text to the corresponding field in a document. As a result, your signer won’t have to complete this field but will be able to edit the information inside if needed. You can customize pre-filled text for text fields, date/time fields, checkbox fields, radio button groups, and dropdown fields. -
How can I ensure that my recipients will complete all the fields in my document?
Make your fields required in the editor by clicking on a fillable field and checking the Required box in the side panel on the right. Your recipients will be automatically guided through all your required fields step by step, and they won’t be able to submit your document without completing all the boxes. -
How do I make a field required?
Add fillable fields to your document in the editor. Then, click on any field that you want to make required and check the Required box at the top of the right-hand sidebar. Repeat the same process for each field that needs to be made required. -
Can you add more than one signature in airSlate SignNow?
Yes, there is a way to add multiple signatures on PDF file. -
Can you add multiple signatures in airSlate SignNow?
Get multiple signatures on a single document. Learn how to get multiple people to sign one document. Use your airSlate SignNow ID to log in to airSlate SignNow Document Cloud. ... Click the Add Files button and choose the document you want to upload. -
How do I add a second signature in airSlate SignNow?
On the Command bar, click Document > Signatures > Add Signature Field . Click and drag to draw a rectangle for the first signature. Click Add Signature Field again . Click and drag a second rectangle for the second signature. -
How do I make sure my recipients place signatures correctly?
With airSlate SignNow, you decide where exactly your signers can add their data, including eSignatures and initials. Simply insert fillable fields wherever you need them in your documents, and recipients will be able to fill out these fields by following the signing order you’ve pre-set. Configuring signing roles will help you assign fields to specific signers. Besides, you can send documents for signing without adding any fillable fields at all by using freeform invites. In this case, your recipients will be able to add their signatures to documents wherever they see fit.
What active users are saying — send pdf for multiple signatures


Frequently asked questions
How do you generate a document and apply an electronic signature to it?
How do I add an electronic signature to a Word document?
How can I send a contract via email with an electronic signature attached?
The ins and outs of eSignature


Find out other add signers your
- ESignature Legitimacy for Trademark Assignment ...
- Boost eSignature legitimacy for Trademark Assignment ...
- ESignature Legitimacy for Trademark Assignment ...
- Unlocking eSignature Legitimacy for Trademark ...
- Unlock eSignature Legitimacy for Trademark Assignment ...
- Boost eSignature Legitimacy for Affidavit of Identity ...
- Unlock eSignature Legitimacy for Affidavit of Identity ...
- Unlock the Power of eSignature Legitimacy for Affidavit ...
- Boost eSignature Legitimacy for Affidavit of Identity ...
- Boost eSignature Legitimacy for Affidavit of Identity ...
- Effortlessly Validate Affidavits of Identity in Canada ...
- Unlock eSignature Legitimacy for Affidavit of Identity ...
- Boost the Legitimacy of Your Affidavit of Service in ...
- Unlock the potential of eSignature legitimacy for ...
- ESignature Legitimacy for Affidavit of Service in ...
- ESignature Legitimacy for Affidavit of Service in ...
- Unlock eSignature Legitimacy for Affidavit of Service ...
- Unlocking eSignature Legitimacy for Affidavit of ...
- Unlock eSignature Legitimacy for Affidavit of Service ...
- Enhance eSignature Legitimacy for Affidavit of Service ...